Geography: This article is applicable for ANZ Transactive - Global customers banking in all ANZ geographies.
Full details are available in Features by Geography.
Full details are available in Features by Geography.
How to Login - Trade application (Security Device User)
It is recommended to periodically clear Cache and Cookies on your computer. Instructions vary depending on your nominated browser. For more information, refer to System Requirements and Cache and Cookies.
| STEP | ACTION |
|---|---|
| 1 | Go to the ANZ Transactive - Global User Log On page: https://transactive.online.anz.com/
|
| 2 | Enter your User ID and click Submit |
| 3 | Log on by following the appropriate procedure below. Note that you will only see the log on options applicable to you.
Token users
Enter your Password and Token OTP response from your token and click Log On
ANZ Digital Key users
Enter your Password and click Log On.
For more information, please refer to How to login using ANZ Digital Key.
ANZ Digital Key (ADK) introduces biometric security identification, allowing you to verify your identity on your phone using your fingerprint, Face ID or PIN.
|
| 4 | Click Applications from the menu, then click on your trade application
RESULT: The application Home screen dashboard will open in a new browser window.
|
How to Login - Trade application (User ID & Password User)
It is recommended to periodically clear Cache and Cookies on your computer. Instructions vary depending on your nominated browser. For more information, refer to System Requirements and Cache and Cookies.
| STEP | ACTION |
|---|---|
| 1 | Go to the ANZ Transactive - Trade ANZ Digital Services page: https://www.anz.com/institutional/digital-services/ |
| 2 | Selected ANZ Transactive - Trade (Company administered)
|
| 3 | Enter your Login ID and Password, then click Login
RESULT: The application Home screen dashboard will open in a new browser window.
|
How to Logout successfully
Once you have finished using ANZ Transactive Trade, it is essential to log out correctly. If you exit the browser window rather than using the Logout button, ANZ Transactive Trade considers the session active for a short time. Please ensure you click Logout to exit the session securely.
Change Password
ANZ administered user
ANZ administered users have an email address, mobile phone number and security questions registered with ANZ. ANZ administered users can utilise the self-service Change Password and Forget Password options available on the Log On page.
Company administered user
Company administered users are created and managed by the Company administrator. You can change your password as follows or contact your Company administrator to reset your password. For more information, please refer to Manage User profiles.
| STEP | ACTION |
|---|---|
| 1 | Click on Your Name from the top right of the screen
|
| 2 | Enter your Current Password, New Password and Retype New Password
Passwords must:
|
| 3 | Click Save.
RESULT: Your password has been changed.
|
Navigating the System
Application Banner
The Application Banner contains features that are accessible from all screens within the application. It is recommended you do not use the controls on your browser’s toolbar, such as Back, Forward and Refresh to navigate through the system.
| FEATURE | DESCRIPTION |
| Home | Return to the Home screen dashboard |
| Mail Messages | View Mail Messages sent to your business entity from ANZ |
| Notifications | View Notifications of transactions processed, returned and cancelled |
| In-Channel Help | In-Channel help text |
| Logout | Log out of the application and any underlying applications in a secure manner |
| User Name/User Preference | Manage your User Preferences, change your password, choose a date format and view your user settings |
| My Links | Add your favourite tasks, frequently used reports, commonly used reference data options and view recent transactions |
| Last Sign-In | View the date and time you last accessed the application |
| Menus | Access the menus assigned to your user entitlements |
Announcements
New announcements about system maintenance, helpful security tips and changes to functionality, etc., will be displayed on the Home screen dashboard upon first login. Click More to view the full message or multiple active messages.
User Preferences
User Preferences allows you to manage your password, email address, date format preference and view your user entitlements. For more information, please also refer to your User profile under the Reference Data menu.
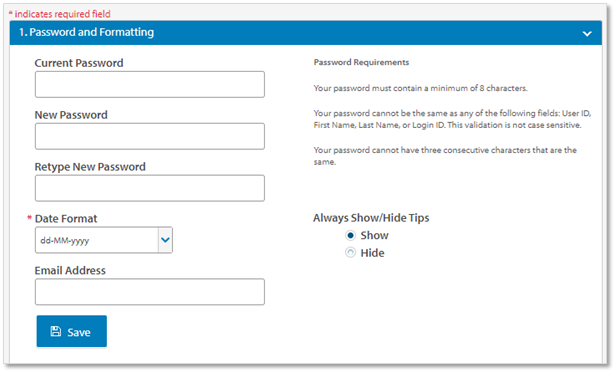
We recommend adding your email address to ensure you receive email notifications.
Refer to Change Password - Company administered user
My Links
In My Links, you can add your Favourite Tasks, including commonly used Reference Data, Recent Instruments, and Favorite Reports.
Favourite Tasks
To add your favourite tasks to your Home screen dashboard, click on My Links, then Favourite Tasks.
- Click the tasks you want to add to your Favourite Tasks
- Select the order to display your tasks
- Click Update
- Click Save
Recent Instruments
To view your recent instruments from your Home screen dashboard, click on My Links, then Recent Instruments.
Favourite Reports
To add your frequently used reports from your Home screen dashboard, click on My Links, then Favourite Reports.
- Click the reports you want to add to your Favourite Reports
- Select the order to display your reports
- Click Update
- Click Save
Customise Grids
You can customise all grids in the system to suit your preferences.
- To hide or show columns, click Settings and untick or tick the checkboxes next to the column name
- To customise the column order, click the column you want to move and then drag and drop the column to your preferred order
- To resize columns, click the edge of the column heading and drag to your preferred size
- To sort columns, click the column heading. The column will reorder in ascending order. Click again to order in descending order
- Click Settings and then click Save Current View or Reset to default view to save or restore grid view
Session Timeout
Your session will time out after 15 minutes of inactivity. A pop-up warning will appear two minutes prior to the session timeout. You can continue working in the system by selecting a button or tab to reactive the session. Alternatively, you can Logout of the system if it is no longer required.
Dashboard
Click Home from the Application Banner to return to the Home screen dashboard at any time. Click Customise Dashboard to customise your dashboard Tiles and Grids.
Home Screen Dashboard
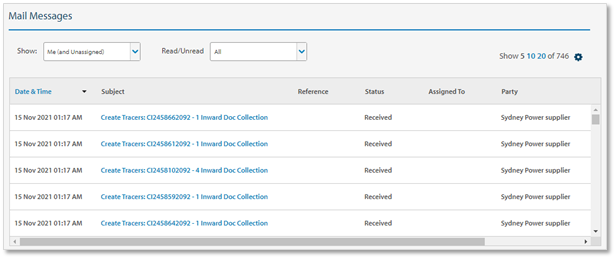
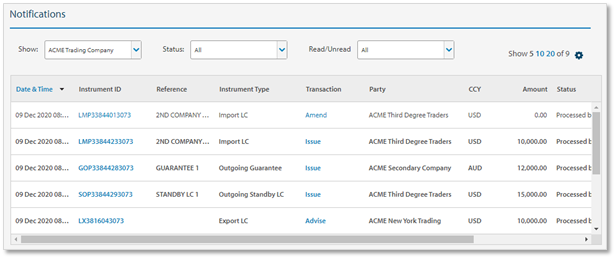
View the current transactions, Mail Messages and Notifications from the Home screen dashboard based on your user entitlements.
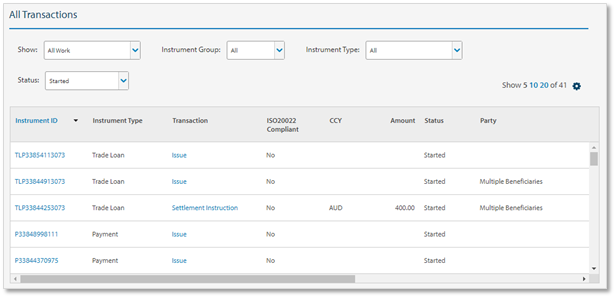

All Transactions
| FILTERS | DESCRIPTION |
| Show | Filter by All Work, My Work, Work for Organisation. |
| Instrument Group | Filter by Instrument Group, e.g., All, Trade, Payables, etc. |
| Instrument Type | Filter by Instrument Type, e.g. Import LC. |
| Status | Filter by transaction Workflow Status. |
| Show 5 10 20 | Click the number of items to show in the grid. |
| Settings | Add or remove columns from the grid. |
COLUMNS
| COLUMN | DESCRIPTION |
| Instrument ID | Click Instrument ID to view the summary and Transaction Log. |
| Instrument Type | Instrument Type details, e.g. Import LC. |
| Transaction | Click Transaction Type, e.g. Issue, to view the details. |
| ISO20022 Compliant | Yes or No. |
| CCY | Transaction currency. |
| Amount | Transaction amount. |
| Status | Transaction workflow status. |
| Party | Counterparty name. |
| Primary Reference | Your instrument reference number. |
| Date Started | Date transaction was created. |
| Vendor ID | Your ERP system's unique party reference ID. |
| Bank Name | Bank group name. |
Mail Messages
| FILTERS | DESCRIPTION |
| Show | Filter by All Mail, by Organisation, Me (and unassigned). |
| Read/Unread | Filter by All, Read Messages or Unread Messages. |
| Show 5 10 20 | Click the number of items to show in the grid. |
| Settings | Add or remove columns from the grid. |
COLUMNS
| COLUMN | DESCRIPTION |
| Date & Time | Date & Time the mail message was received. |
| Subject | Click Subject to view the mail message. |
| Reference | Your instrument reference number. |
| Status |
|
| Assigned To | User to who the message is assigned. |
| Party | Counterparty name. |
| Vendor ID | Your ERP system's unique party reference ID. |
Notifications
| FILTERS | DESCRIPTION |
| Show | Filter by All, or by Organisation. |
| Status | Filter by Status. |
| Read/Unread | Filter by All, Read Notifications or Unread Notifications. |
| Show 5 10 20 | Click the number of items to show in the grid. |
| Settings | Add or remove columns from the grid. |
COLUMNS
| COLUMN | DESCRIPTION |
| Date & Time | Date & Time the notification was received. |
| Instrument ID | Click Instrument ID to view the summary and Transaction Log. |
| Reference | Your instrument reference number. |
| Instrument Type | Instrument Type details, e.g. Import LC. |
| Transaction | Click Transaction Type, e.g. Issue, to view the details. |
| Party | Counterparty name. |
| CCY | Transaction currency. |
| Amount | Transaction amount. |
| Status | Transaction workflow status. |
| Vendor ID | Your ERP system's unique party reference ID. |
Pre-Debit Notifications
| FILTER | DESCRIPTION |
| Show | Filter by All Mail, by Organisation, Me (and unassigned). |
| Read/Unread | Filter by All, Read Messages or Unread Messages. |
| Payment Date From | Select From date. |
| Payment Date To | Select To date. |
| Currency | Filter by Currency. |
| Show 5 10 20 | Click the number of items to show in the grid. |
| Settings | Add or remove columns from the grid. |
COLUMNS
| COLUMN | DESCRIPTION |
| Date & Time | Date & Time the Notification was received. |
| Subject | Funding Notification <Instrument ID>. |
| Reference | Your instrument reference number. |
| CCY | Transaction currency. |
| Payment Amount | Payment amount. |
| Payment Date | Expected settlement date. |
| Assigned To. | User to who the Pre-Debit Notification is assigned. |
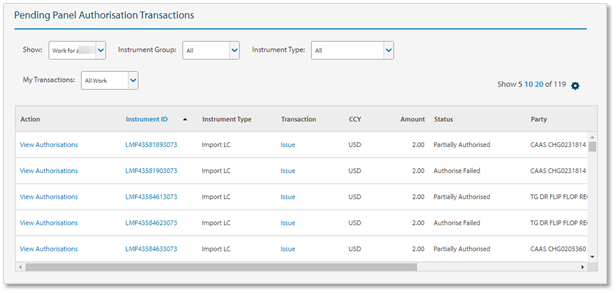
Pending Panel Authorisation Transactions
| FILTERS | DESCRIPTION |
| Show | Filter by All Work, Organisation. |
| Instrument Group | Filter by Instrument Group, e.g., All, Trade, Payables, etc. |
| Instrument Type | Filter by Instrument Type, e.g. Import LC. |
| My Transactions | Filter by All Work, My Work |
| Show 5 10 20 | Click the number of items to show in the grid. |
| Settings | Add or remove columns from the grid. |
COLUMNS
| COLUMN | DESCRIPTION |
| Action | Click Action to view remaining Panel Authorisation requirements and trigger email notifications to pending authorisers. |
| Instrument ID | Click Instrument ID to view the summary and Transaction Log. |
| Instrument Type | Instrument Type details, e.g. Import LC. |
| Transaction | Click Transaction Type, e.g. Issue, to view the details. |
| CCY | Transaction currency. |
| Amount | Transaction amount. |
| Status | Transaction workflow status. |
| Party | Counterparty name. |
| Primary Reference | Your instrument reference number. |
| Date Started | Date transaction was created. |
PENDING PANEL AUTHORISATION FOR:
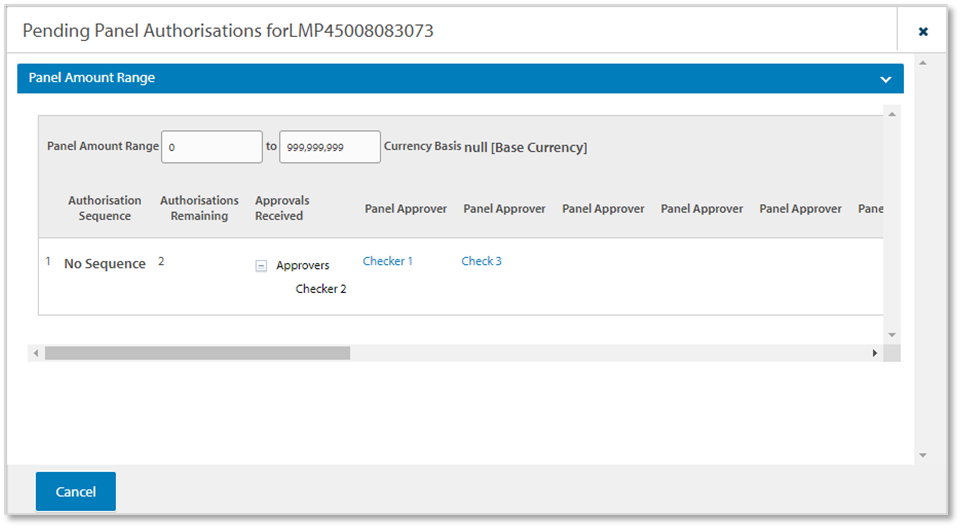
- Click View Authorisations for an instrument to view the Panel Authorisation requirements and Panel Amount Range.
| COLUMNS | DESCRIPTION |
| Panel Amount Range | Currency and panel amount value. |
| Authorisation Sequence | Sequence of panel approvals required. |
| Authorisations Remaining | Number of remaining authorisers required to complete the approval process. |
| Approvals Received | List of panel approvers already received. |
| Panel Approver(s) | List of panel approvers required to complete the approval process.
|
For more information, please refer to Manage Panel Authorisation Group under the Reference Data menu.
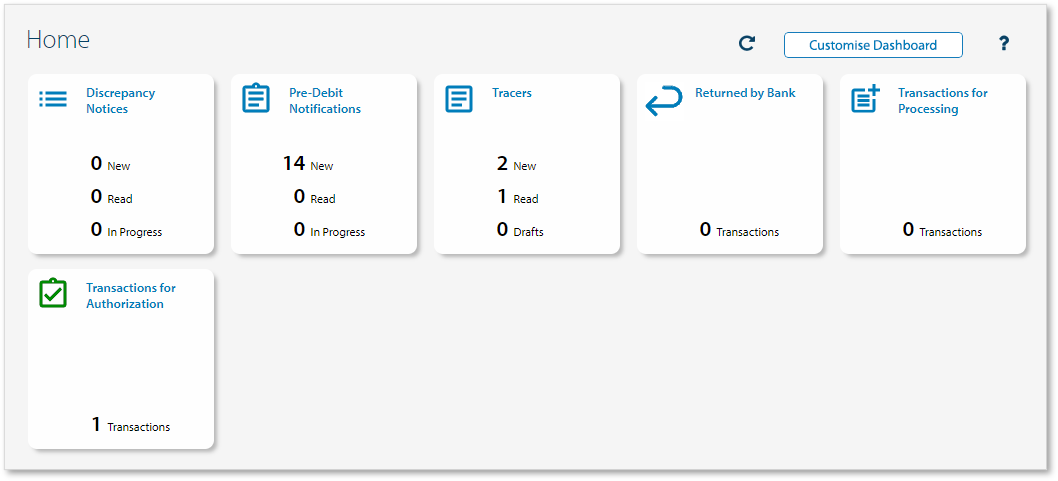
Dashboard Tiles
Dashboard tiles provide a high-level view of important and frequently used tasks.
| TILE | DESCRIPTION |
| Transactions for Authorisation | Number of transactions requiring authorisation.
|
| Transactions for Processing | Number of transactions requiring processing.
|
| Returned by Bank | Number of transactions returned by the bank.
|
| Pre-Debit Notifications | Number of new, read and in progress Pre-Debit Notifications.
|
| Tracers | Number of the new, read and draft Tracers.
|
| Discrepancy Notices | Number of new, read and in progress Discrepancy Notices.
|
Customise Dashboard
The ANZ Transactive Trade dashboard is the default screen you see when you log into the application. This screen is customisable, allowing you to choose and arrange content that suits your needs.
- Click Customise Dashboard
- Choose your required Messages and Transactions to appear in the grid on your dashboard
- Choose your required tiles to appear on your dashboard
- Order your grid and tiles in which it will be displayed on your Home screen dashboard.
- Click Preview to view the layout of your dashboard, then click x
- Click Save & Close
RESULT: Your dashboard will be displayed in the order of your preferences.
How to create a new instrument
There are multiple ways to create a new Instrument. Please choose from one of the following methods:
- Method 1: Click New Instrument from the Application Banner menu, then choose Instrument Type
- Method 2: Click New Instrument from the Application Banner menu, then Choose Template
- Method 3: Click New Instrument from the Application Banner menu, then Copy From Existing
- Method 4: Open a previous Instrument, then click Copy Instrument
- Method 5: Click Transactions from the Application Banner menu, then Pending Transactions or History. Choose an Instrument from the grid, then click Copy Selected
New Instrument
Creating a new instrument from a blank form allows you to manually enter all details into the instrument type selected, e.g. Guarantee, Trade Loan, Import Letter of Credit, etc. without any pre-populated fields. Instrument types available are based on your Organisation's requirements.
To create a new instrument from a blank form, follow the below steps:
| STEP | ACTION |
| 1 | Click New Instrument from the Application Banner menu |
| 2 | Click the new trade instrument type
RESULT: A blank instrument form is available for manual data entry.
|
Choose Template
Creating a new instrument from an existing template allows you to use data from a preconfigured form, requiring minimal input. A Template Search enables you to select the template to create your new instrument. For more information, please refer to Manage Templates.
To create a new instrument from a template, follow the below steps:
| STEP | ACTION |
| 1 | Click New Instrument from the Application Banner menu |
| 2 | Click Choose Template |
| 3 | Choose the Template Name from the Template Search window |
| 4 | Click Select
RESULT: The preconfigured form is available for any additional input or editing.
|
Copy From Existing
Copying from an existing instrument allows you to use the same input data from a previous transaction. The Instrument Search enables you to select the instrument to copy data.
To create a new instrument from an existing instrument, follow the below steps:
| STEP | ACTION |
| 1 | Click New Instrument from the Application Banner menu |
| 2 | Click Copy From Existing |
| 3 | Search and choose the Instrument from the Trade Search window |
| 4 | Click Select
RESULT: The copied instrument is available for any additional input or editing.
|
Copy Instrument
Copying from an existing instrument allows you to use the same input data from a previous transaction. To create a new instrument from an existing instrument, follow the below steps:
| STEP | ACTION |
| 1 | Open and view an existing instrument from any of the Trade screens |
| 2 | Click Copy Instrument from the Context Panel
RESULT: The copied instrument is available for any additional input or editing.
|
Copy Selected
Copying from an existing instrument allows you to use the same input data from a previous transaction. To create a new instrument from an existing instrument, follow the below steps:
| STEP | ACTION |
| 1 | Click Transactions from the Application Banner menu |
| 2 | Click either Pending Transactions or History |
| 3 | Choose the Instrument from the grid |
| 4 | Click Copy Selected |
| 5 | Choose to:
|
| 6 | Click Continue
RESULT: The copied instrument or template is available for any additional input or editing.
|