Geography: This article is applicable for ANZ Transactive - Global customers banking in all ANZ geographies.
Full details are available in Features by Geography.
Full details are available in Features by Geography.
Mail Messages
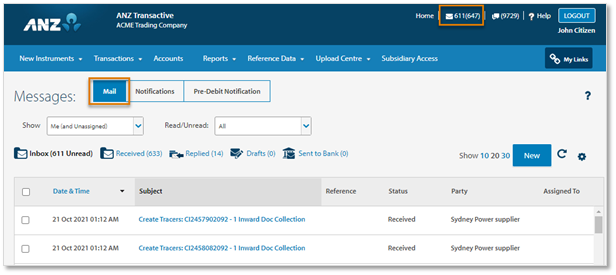
View read or unread mail messages sent to your organisation from ANZ, or create and send messages to ANZ based on your user entitlements. You can view mail messages directly from your Home screen dashboard or via the Envelope icon from the Application Banner.

Mail Messages Screen
| FILTER | DESCRIPTION |
| Show | Filter by All Mail, Parent company, Subsidiary company, or Me (and unassigned). |
| Read/Unread Filter | Filter by All, Read Messages or Unread Messages. |
| Inbox Unread | Number of unread Mail Messages. |
| Received | Number of received Mail Messages. |
| Replied | Number of replied Mail Messages. |
| Drafts | Number of drafted Mail Messages. |
| Sent to Bank | Number of Mail Messages Sent to Bank. |
Control Bar
| CONTROL BAR ITEM | DESCRIPTION |
| Show 10 20 30 | Click to show number of Mail Messages in the grid. |
| New | Click New to create a Mail Message. |
| Refresh | Click to Refresh the records on screen. |
| Settings | Add or remove columns. |
Columns
| COLUMN | DESCRIPTION |
| Date & Time | Date & Time the Mail Messages received. |
| Subject | The subject title of the Mail Message. |
| Reference | Your reference number. |
| Status |
|
| Party | Counterparty name. |
| Assigned To | User to who the Mail Message is assigned. |
| Vendor ID | Your ERP system's unique party reference ID. |
Create Mail Messages
- Click the Envelope from the Application Banner
- Click New to create a Mail Message
- Enter Subject title
- If required, enter Instrument ID
- Enter Message
- If required, click Attach Document
- Click Send to Bank
RESULT: Message successfully sent to the bank. 
View Mail Messages
- Click the Envelope from the Application Banner
- Click the Subject to view the Mail Message
- Click Close
Delete Mail Messages
- Click the Envelope from the Application Banner
-
Use one of the following methods to Delete a Mail Message:
- Method 1: Click the Subject to view the Mail Message, then click Delete
- Method 2: Select the Mail Message(s) from the grid, then click Delete
- Click OK
RESULT: Message successfully deleted from the Mail Messages screen. 
The message can continue to be retrieved from within the Instrument ID.
Route Mail Message
- Click the Envelope from the Application Banner
- Use one of the following methods to Route a Mail Message:
- Method 1: Click the Subject to view the Mail Message, then click Route
- Method 2: Select the Mail Message(s) from the grid, then click Route
- Select recipient Person or Organisation
- Click Route Item(s)
RESULT: Message successfully routed to the recipient who will receive an email notification. 
We recommend adding your email address to ensure you receive email notifications. For more information, please refer to Navigating the System > User Preferences.
Notifications
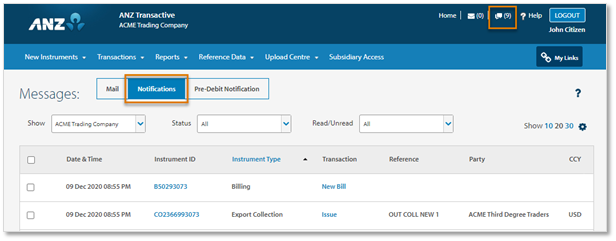
View transaction related notifications sent to your organisation from ANZ. You can view Notifications directly from your Home screen dashboard or via the Speech icon from the Application Banner. For more information, please refer to your Notification Rules under the Reference Data menu.

Notifications Screen
| FILTER | DESCRIPTION |
| Show | Filter by All, Parent company or Subsidiary company. |
| Status | Filter by Status. |
| Read/Unread | Filter by All, Read Notifications or Unread Notifications. |
Control Bar
| CONTROL BAR ITEM | DESCRIPTION |
| Show 10 20 30 | Click to show number of Notifications in the grid. |
| Settings | Add or remove columns. |
Columns
| COLUMN | DESCRIPTION |
| Date & Time | Date & Time the Notification was received. |
| Instrument ID | The system generated Instrument ID. |
| Instrument Type | Instrument Type, e.g. Import LC |
| Transaction | Transaction type, e.g. Issue |
| Reference | Your reference number. |
| Party | Counterparty name. |
| CCY | Transaction currency. |
| Amount | Transaction amount. |
| Status | Notification status. |
| Vendor ID | Your ERP system's unique party reference ID. |
View Notifications
- Click the Speech icon from the Application Banner
- Click Instrument ID or Transaction type to view the transaction summary
- Click Close
Delete Notifications
- Click the Speech icon from the Application Banner
- Select the Transaction(s) from the grid
- Click Delete
- Click OK
RESULT: Notification successfully deleted. 
Pre-Debit Notifications
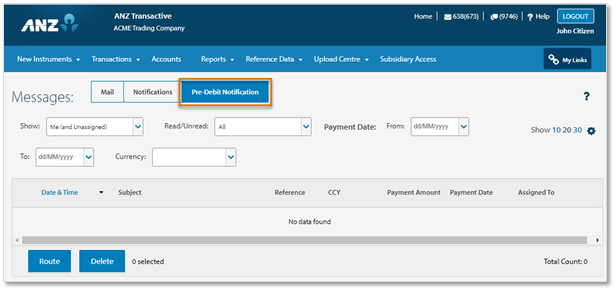
View Pre-Debit Notifications when a settlement or payment instruction is required. You can view Pre-Debit Notifications directly from your Home screen dashboard or via the Speech icon from the Application Banner.

Pre-Debit Notifications Screen
| FILTER | DESCRIPTION |
| Show | Filter by All Mail, Parent company, Subsidiary company, or Me (and unassigned). |
| Read/Unread | Filter by All, Read Messages or Unread Messages. |
| Payment Date From | Select From date. |
| Payment Date To | Select To date. |
| Currency | Filter by Currency. |
Control Bar
| CONTROL BAR ITEM | DESCRIPTION |
| Show 10 20 30 | Click to show number of Pre-Debit Notifications in the grid. |
| Settings | Add or remove columns. |
Columns
| COLUMN | DESCRIPTION |
| Date & Time | Date & Time the Notification was received. |
| Subject | Settlement Instruction Request, including Instrument ID. |
| Reference | Your reference number. |
| CCY | Transaction currency. |
| Payment Amount | Payment amount. |
| Payment Date | Expected settlement date. |
| Assigned To. | Pre-Debit Notification assigned to the user. |
View Pre-Debit Notifications
- Click the Speech icon from the Application Banner, then Pre-Debit Notifications
- Click Subject to view the Pre-Debit Notification
- Click Close
Delete Pre-Debit Notifications
- Click the Speech icon from the Application Banner, then Pre-Debit Notifications
-
Use one of the following methods to Delete a Pre-Debit Notification:
- Method 1: Click the Subject to view the Pre-Debit Notification, then click Delete
- Method 2: Select the Pre-Debit Notification(s) from the grid, then click Delete
- Click OK
RESULT: Pre-Debit Notification successfully deleted. 
Route Pre-Debit Notifications
- Click the Speech icon from the Application Banner, then Pre-Debit Notifications
- Use one of the following methods to Route a Pre-Debit Notifications:
- Method 1: Click the Subject to view the Pre-Debit Notifications, then click Route
- Method 2: Select the Pre-Debit Notifications(s) from the grid, then click Route
- Select recipient Person or Organisation
- Click Route Item(s)
RESULT: Pre-Debit Notification successfully routed to the recipient who will receive an email notification. 
We recommend adding your email address to ensure you receive email notifications. For more information, please refer to User Preferences.