| 18 |
Payment Reports
Beneficiary Advice
-
Report Format available is PDF.
-
Report Language available is English.
-
Report Encoding available is Unicode (UTF-8).
-
Select Show Data For (Value Date).
Choose from:
- Today
- Yesterday
- Week to Date (current week, beginning Monday, to today)
- Previous Week (Mon–Sun of previous week)
- Month to Date
- Previous Month
- If required, enter Payment ID.
- If required, enter Payment Reference.
- Add one or more Divisions to the report:
- Click + to display the Search Divisions window.
- Select one or more Divisions.
- Click Add.
- If required, add payments funded from specific Accounts:
- Click Add to display the Add Accounts window.
- Select one or more accounts.
- Click Ok.
Beneficiary Audit Report
-
Report Formats available are CSV or PDF.
-
Report Languages available are English or Simplified Chinese.
-
Report Encoding available for CSV is UTF-8 or US-ASCII.
-
Select Show Data For (Last Modified).
Choose from:
- Today
- Yesterday
- Week to Date (current week, beginning Monday, to today)
- Previous Week (Mon-Sun of previous week)
- Month to Date (current month to today)
- Previous Month
- If required, enter Beneficiary ID.
- If required, enter Beneficiary Name.
- If required, enter Beneficiary Nickname.
-
If required, select a beneficiary Status.
Choose from:
- Approved
- Pending Approved
- Creation Rejected
- Modification Rejected
- Modification Pending Approval
- Deletion Pending Approval, or
- Deletion approved
- Add one or more Divisions to the report:
- Click + to display the Search Divisions window.
- Select one or more Divisions.
- Click Add.
- If required, enter Beneficiary Country.
File Import Summary Report
-
Report Formats available are CSV, PDF or XLSX.
-
Report Languages are English, Traditional Chinese, Japanese, Vietnamese, Khmer or Simplified Chinese.
-
Report Encoding available for CSV are:
Choose from
- English: UTF-8, US-ASCII
- Traditional Chinese: Big5, UTF-8
- Japanese: Shift-JIS, 1byte Kana, UTF-8
- Vietnamese: Windows, UTF-8
- Khmer: UTF-8
- Simplified Chinese: GB2312, UTF-8
-
Select Show Data For (File Uploaded Date).
Choose from
- Today
- Yesterday
- Week to Date (current week, beginning Monday, to today)
- Previous Week (Mon-Sun of previous week)
- Month to Date (current month to today)
- Previous Month
- If required, enter File ID.
- If required, enter File Name.
- Add one or more Divisions:
- Click + to display the Search Divisions window.
- Select one or more Divisions.
- Click Add.
- The File Type is PAYMENT.
- If required, select a specific File Format.
- If required, add a specific File Status:
- Click + to display the Search File Status window.
- Select one or more file statuses.
- Click Add.
Payment Audit Report
-
Report Formats available are CSV, PDF or XLSX.
-
Report Languages are English or Simplified Chinese.
-
Report Encoding available for CSV is UTF-8 or US-ASCII.
-
Select Show Data For (Value Date).
Choose from
- Today
- Yesterday
- Week to Date (current week, beginning Monday, to today)
- Previous Week (Mon-Sun of previous week)
- Month to Date (current month to today)
- Previous Month
- If required, enter Payment ID.
- If required, enter Payment Reference.
- Add one or more Divisions to the report:
- Click + to display the Search Divisions window.
- Select one or more Divisions.
- Click Add.
- If required, add payments funded from specific Accounts to the report:
- Click + to display the Add Accounts window.
- Select one or more accounts
- Click Ok.
- If required, add Payment Type:
- Click + to display the Search Payment Type window.
- Select one or more payment types
- Click Add
- If required, select Payment Purpose. Choose from Normal or Salary.
- If required, add Payment Status:
- Click + to display the Search Payment Status window.
- Select one or more payment statuses.
- Click Add.
Payment Detail Report
-
Report Formats available are CSV, PDF or XLSX.
-
Report Languages are English or Simplified Chinese.
-
Report Encoding available for CSV is UTF-8 or US-ASCII.
-
Select Show Data For (Value Date).
Choose from
- Today
- Yesterday
- Week to Date (current week, beginning Monday, to today)
- Previous Week (Mon-Sun of previous week)
- Month to Date (current month to today)
- Previous Month
- Select Payments From - Current Payments or Past Payments.
- If required, enter Payment ID.
- If required, enter Payment Reference.
- Add one or more Divisions to the report:
- Click + to display the Search Divisions window.
- Select one or more Divisions.
- Click Add.
- If required, add payments funded from specific Accounts to the report:
- Click + to display the Add Accounts window.
- Select one or more accounts.
- Click Ok.
- If required, add Payment Type:
- Click + to display the Search Payment Type window.
- Select one or more payment types.
- Click Add.
- If required, select Payment Purpose from Normal or Salary.
- If required, add Payment Status to the report:
- Click + to display the Search Payment Status window.
- Select one or more payment statuses.
- Click Add.
Payment Summary Report
-
Report Formats available are CSV, PDF or XLSX.
-
Report Languages are English or Simplified Chinese.
-
Report Encoding available for CSV is UTF-8 or US-ASCII.
-
Select Show Data For (Value Date).
Choose from
- Today
- Yesterday
- Week to Date (current week, beginning Monday, to today)
- Previous Week (Mon-Sun of previous week)
- Month to Date (current month to today)
- Previous Month
- Select Payments From - Current Payments or Past Payments.
- If required, enter Payment ID.
- If required, enter Payment Reference.
- Add one or more Divisions to the report:
- Click + to display the Search Divisions window.
- Select one or more Divisions.
- Click Add.
- If required, add payments funded from specific Accounts to the report:
- Click + to display the Add Accounts window.
- Select one or more accounts.
- Click Ok.
- If required, add a specific Payment Type to the report:
- Click + to display the Search Payment Type window.
- Select one or more payment types.
- Click Add.
- If required, enter Total Payment Amount.
- If required, select a Payment Purpose from Normal or Salary.
- If required, select a specific Payment Currency.
- If required, add a specific Payment Status:
- Click + to display the Search Payment Status window.
- Select one or more payment statuses.
- Click Add.
- Tick the checkbox to Include Beneficiary Details.
Statement of Charges Report
This report is only available in China.
-
Report Formats available are CSV or PDF.
-
Report Languages are English or Simplified Chinese.
-
Report Encoding available for CSV is English: UTF-8 or Simplified Chinese: GB2312, UTF-8.
-
Select Show Data For (Charge Date).
Choose from
- Today
- Yesterday
- Week to Date (current week, beginning Monday, to today)
- Previous Week (Mon-Sun of previous week)
- Month to Date (current month to today)
- Previous Month
- If required, enter Payment ID.
- Add one or more Divisions to the report:
- Click + to display the Search Divisions window.
- Select one or more Divisions.
- Click Add.
- If required, add payments funded from specific Accounts to the report:
- Click + to display the Add Accounts window.
- Select one or more accounts.
- Click Ok.
- If required, add Payment Type to the report:
- Click + to display the Search Payment Type window.
- Select one or more payment types.
- Click Add.
- Tick the checkbox to Include instruction level charges if available.
Template Audit Report
-
Report Formats available are CSV or PDF.
-
Report Languages are English or Simplified Chinese.
-
Report Encoding available for CSV is English: UTF-8 or Simplified Chinese: GB2312, UTF-8.
-
Select Show Data For (Last Modified).
Choose from
- Today
- Yesterday
- Week to Date (current week, beginning Monday, to today)
- Previous Week (Mon-Sun of previous week)
- Month to Date (current month to today)
- Previous Month
- If required, enter Template Name.
- If required, enter Template Description.
- If required, add templates in a specific Template Status:
- Click + to display the Search Template Status window.
- Select one or more template statuses.
- Click Add.
- Add templates that belong to a Division:
- Click + to display the Search Divisions window.
- Select one or more Divisions.
- Click Add.
- If required, add templates with specific funding Accounts:
- Click + to display the Add Accounts window.
- Select one or more accounts.
- Click Ok.
- If required, add templates with a specific Payment Type:
- Click + to display the Search Payment Type window.
- Select one or more payment types.
- Click Add.
- If required, select a Payment Purpose from Normal or Salary.
Receivable Reports
Credit Advice
This report is only available in China.
-
Report Format available in PDF.
-
Report Language available in English.
-
Select Show Data For (Value Date).
Choose from
- Today
- Yesterday
- Week to Date (current week, beginning Monday, to today)
- Previous Week (Mon-Sun of previous week)
- Month to Date (current month to today)
- Previous Month
- If required, enter ANZ Reference.
- Add one or more Divisions to the report:
- Click + to display the Search Divisions window.
- Select one or more Divisions.
- Click Add.
- If required, add payments funded from one or more Accounts to the report:
- Click + to display the Add Accounts window.
- Select one or more accounts.
- Click Ok.
Direct Debit Audit Report
View sample Direct Debit Audit Report
Sample Reports are an indication only to illustrate the layout of information. Reports can be downloaded in CSV, PDF or XLSX. 
-
Report Formats available are CSV, PDF or XLSX.
-
Report Languages available are English, Traditional Chinese, Japanese, Vietnamese, Khmer or Simplified Chinese.
-
Report Encoding available for CSV are:
Choose from
- English: UTF-8, US-ASCII
- Traditional Chinese: Big5, UTF-8
- Japanese: Shift-JIS, 1byte Kana, UTF-8
- Vietnamese: Windows, UTF-8
- Khmer: UTF-8
- Simplified Chinese: GB2312, UTF-8
-
Select Show Data For (Value Date).
Choose from
- Today
- Yesterday
- Week to Date (current week, beginning Monday, to today)
- Previous Week (Mon-Sun of previous week)
- Month to Date (current month to today)
- Previous Month
- If required, enter Direct Debit ID.
- If required, enter Direct Debit Reference.
- Add one or more Divisions to the report:
- Click + to display the Search Divisions window.
- Select one or more Divisions.
- Click Add.
- If required, add direct debits from specific Accounts to the report:
- Click + to display the Add Accounts window.
- Select one or more accounts.
- Click Ok.
- If required, add a specific Direct Debit Status to the report:
- Click + to display the Search Payment Status window.
- Select one or more payment statuses.
- Click Add.
Direct Debit File Import Summary Report
View sample Direct Debit File Import Summary Report
Sample Reports are an indication only to illustrate the layout of information. Reports can be downloaded in CSV, PDF or XLSX. 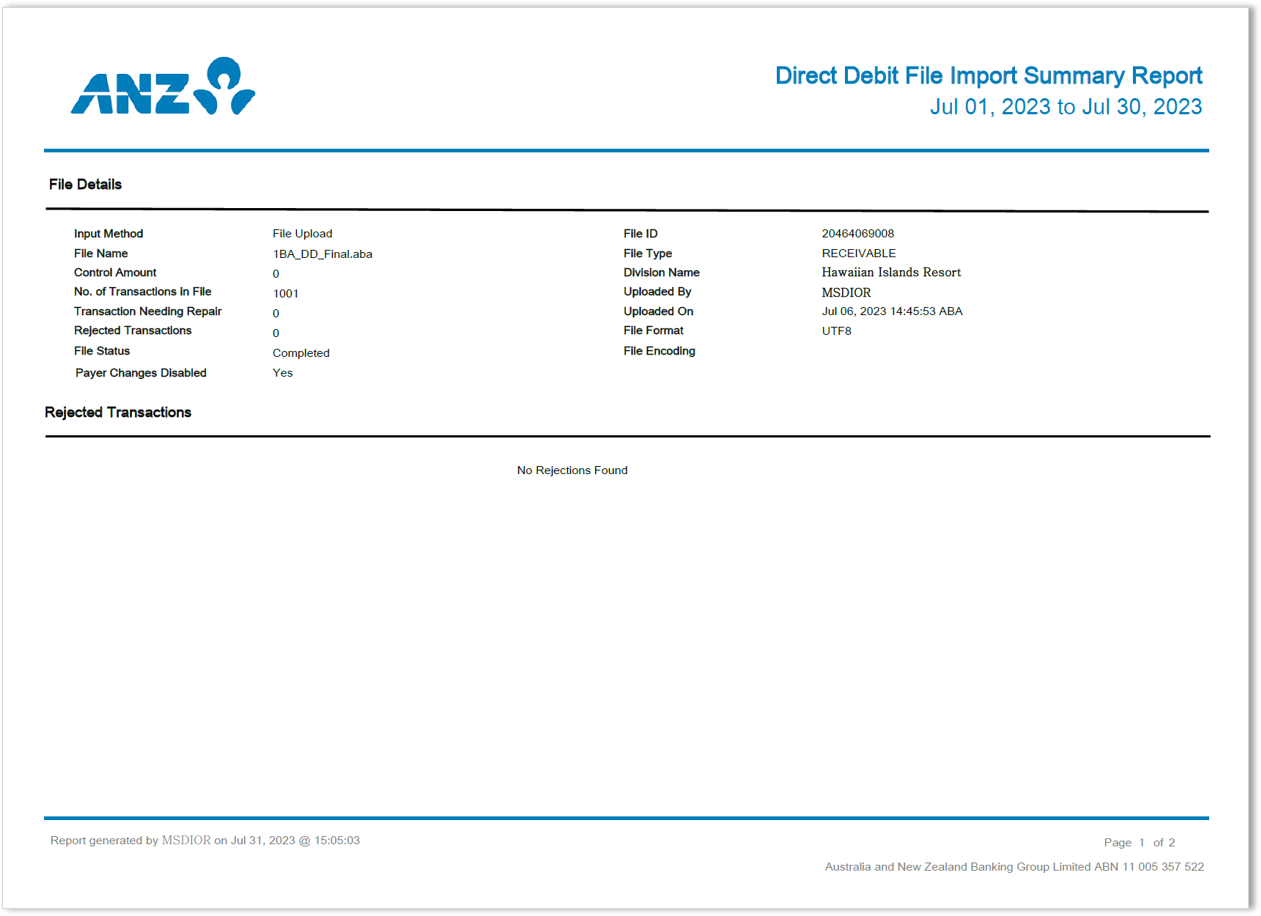
-
Report Formats available are CSV, PDF or XLSX.
-
Report Languages available are English, Traditional Chinese, Japanese, Vietnamese, Khmer or Simplified Chinese.
-
Report Encoding available for CSV are:
Choose from
- English: UTF-8, US-ASCII
- Traditional Chinese: Big5, UTF-8
- Japanese: Shift-JIS, 1byte Kana, UTF-8
- Vietnamese: Windows, UTF-8
- Khmer: UTF-8
- Simplified Chinese: GB2312, UTF-8
-
Select Show Data For (File Upload Date).
Choose from
- Today
- Yesterday
- Week to Date (current week, beginning Monday, to today)
- Previous Week (Mon-Sun of previous week)
- Month to Date (current month to today)
- Previous Month
- If required, enter File ID.
- If required, enter File Name.
- Add one or more Divisions to the report:
- Click + to display the Search Divisions window.
- Select one or more Divisions.
- Click Add.
- If required, select a specific File Format.
- If required, add a specific File Status to the report:
- Click + to display the Search File Status window.
- Select one or more file statuses.
- Click Add.
Direct Debit Summary Report
View sample Direct Debit Summary Report
Sample Reports are an indication only to illustrate the layout of information. Reports can be downloaded in CSV, PDF or XLSX. 
-
Report Formats available are CSV, PDF or XLSX.
-
Report Languages available are English, Traditional Chinese, Japanese, Vietnamese, Khmer or Simplified Chinese.
-
Report Encoding available for CSV are:
Choose from
- English: UTF-8, US-ASCII
- Traditional Chinese: Big5, UTF-8
- Japanese: Shift-JIS, 1byte Kana, UTF-8
- Vietnamese: Windows, UTF-8
- Khmer: UTF-8
- Simplified Chinese: GB2312, UTF-8
-
Select Show Data For (Value Date).
Choose from
- Today
- Yesterday
- Week to Date (current week, beginning Monday, to today)
- Previous Week (Mon-Sun of previous week)
- Month to Date (current month to today)
- Previous Month
- Select to include Direct Debits From Current Direct Debits or Past Direct Debits.
- If required, enter Direct Debit ID.
- If required, enter Direct Debit Reference.
- Add templates that belong to a Division:
- Click + to display the Search Divisions window.
- Select one or more Divisions.
- Click Add.
- If required, add direct debits from specific Accounts to the report:
- Click + to display the Add Accounts window.
- Select one or more accounts.
- Click Ok.
- If required, enter Total Direct Debit Amount
- If required, select a specific Direct Debit Currency.
- If required, add a specific Direct Debit Status to the report:
- Click Add to display the Search Payment Status window.
- Select one or more payment statuses.
- Click Add.
- Tick the checkbox to Include Payer Details.
Direct Debit Template Audit Report
View sample Direct Debit Template Audit Report
Sample Reports are an indication only to illustrate the layout of information. Reports can be downloaded in CSV or PDF. 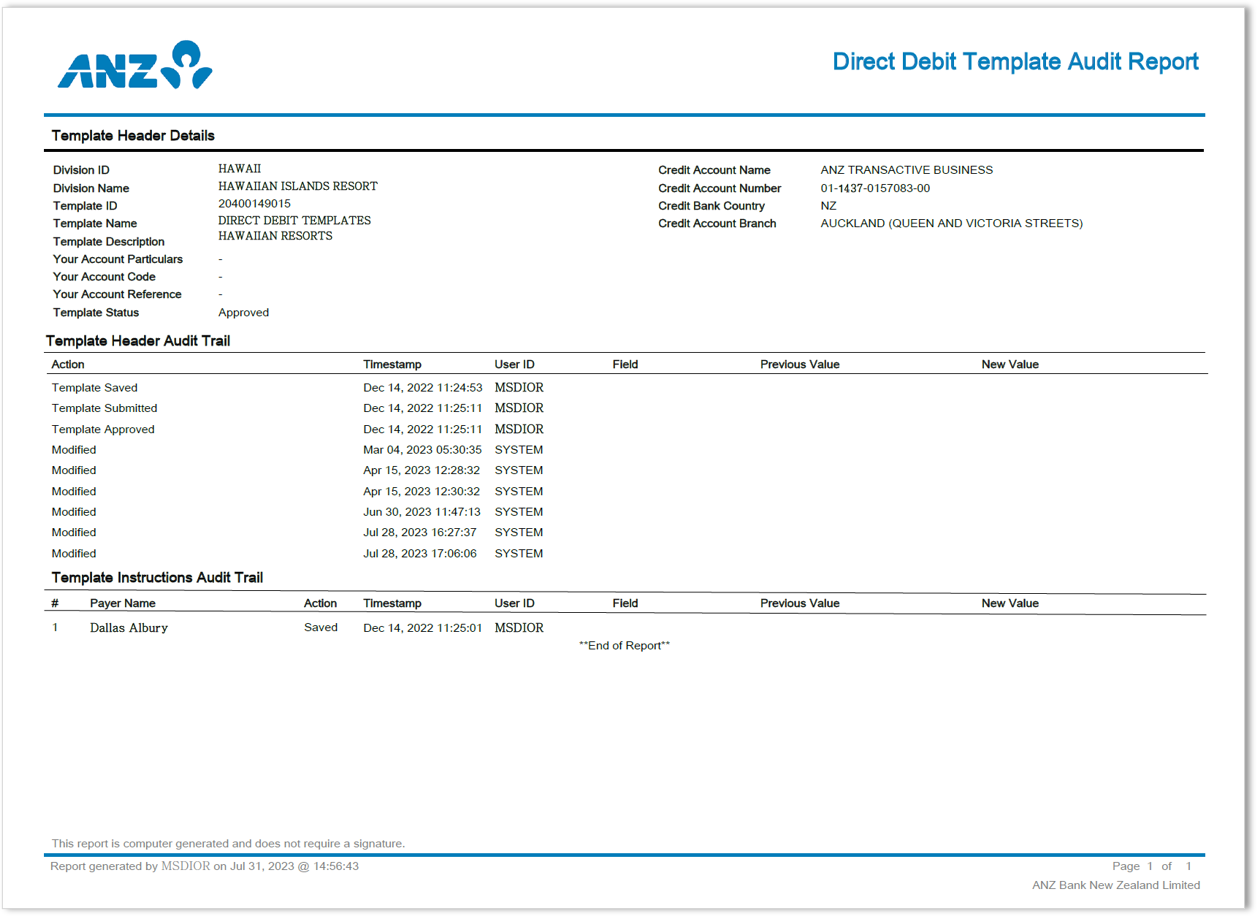
-
Report Formats available are CSV or PDF.
-
Report Languages available are English, Traditional Chinese, Japanese, Vietnamese, Khmer or Simplified Chinese.
-
Report Encoding available for CSV are:
Choose from
- English: UTF-8, US-ASCII
- Traditional Chinese: Big5, UTF-8
- Japanese: Shift-JIS, 1byte Kana, UTF-8
- Vietnamese: Windows, UTF-8
- Khmer: UTF-8
- Simplified Chinese: GB2312, UTF-8
-
Select Show Data For (Last Modified).
Choose from
- Today
- Yesterday
- Week to Date (current week, beginning Monday, to today)
- Previous Week (Mon-Sun of previous week)
- Month to Date (current month to today)
- Previous Month
- If required, enter Template Name.
- If required, enter Template Description.
- Add templates that belong to a Division:
- Click + to display the Search Divisions pop-up window
- Select one or more Divisions.
- Click Add.
- If required, add templates in a specific Template Status:
- Click + to display the Search Template Status window.
- Select one or more template statuses.
- Click Add.
Direct Debit Template Summary Report
View sample Direct Debit Template Summary Report
Sample Reports are an indication only to illustrate the layout of information. Reports can be downloaded in CSV, PDF or XLSX. 
-
Report Formats available are CSV, PDF or XLSX.
-
Report Languages available are English, Traditional Chinese, Japanese, Vietnamese, Khmer or Simplified Chinese.
-
Report Encoding available for CSV are:
Choose from
- English: UTF-8, US-ASCII
- Traditional Chinese: Big5, UTF-8
- Japanese: Shift-JIS, 1byte Kana, UTF-8
- Vietnamese: Windows, UTF-8
- Khmer: UTF-8
- Simplified Chinese: GB2312, UTF-8
- If required, enter Template ID.
- If required, enter Template Name.
- If required, enter part of all of a Direct Debit Reference.
- Add templates that belong to a Division:
- Click + to display the Search Divisions window.
- Select one or more Divisions.
- Click Add.
- If required, enter Total Direct Debit Amount.
- If required, select a specific Direct Debit Currency.
- If required, add templates in a specific Template Status:
- Click + to display the Search Template Status window.
- Select one or more template statuses.
- Click Add.
- Tick the checkbox to Include Payer Details.
Receivable Detail Report
This report is only available in China.
-
Report Formats available are CSV or PDF.
-
Report Languages available are English or Simplified Chinese.
-
Report Encoding for CSV are: English: UTF-8 or Simplified Chinese: GB2312, UTF-8.
-
Select Show Data For (Value Date).
Choose from
- Today
- Yesterday
- Week to Date (current week, beginning Monday, to today)
- Previous Week (Mon-Sun of previous week)
- Month to Date (current month to today)
- Previous Month
- If required, select a Reference.
- If required, enter Total Payment Amount.
- Add one or more Divisions to the report:
- Click + to display the Search Divisions window.
- Select one or more Divisions.
- Click Add.
- If required, add payments funded from one or more Accounts to the report:
- Click + to display the Add Accounts window.
- Select one or more accounts.
- Click Ok.
- If required, add a specific Payment Type to the report:
- Click Add to display the Search Payment Type window.
- Select one or more payment types.
- Click Add.
|