A Book Transfer payment allows you to transfer funds from your Taiwan domiciled account registered to ANZ Transactive - Global, to a beneficiary's ANZ account within Taiwan. For more information, please refer to Asia & Pacific Payment Types.
Payment Method Rules for Book Transfer Payments
Value date will default with the current or next business date if the payment is created on a non-business date. If today's payment misses the cut-off time, your payment will remain in a processing status until it is processed on the next business date.
Non-business day - ANZ Transactive – Global will not allow you to create a payment where the Value Date is a non-business day (e.g., weekend, public holiday, bank holiday) or a currency holiday
Payment currency includes ANZ-supported and tradeable currencies
Eligible users with Initiator and account access can create and manage a Book Transfer payment based on your organisation's predetermined user permissions and payment settings. These role permissions can include:
Initiator
Initiate/Authorise
Full Access
Only users who are entitled to Payroll Payments will be able to view, edit and approve payments when the Payroll indicator selected.
Payment input screens
Domestic Payment screen
The following image is an example of a domestic payment screen with fields including the division, debit account, payment method, execution date, and beneficiary details.
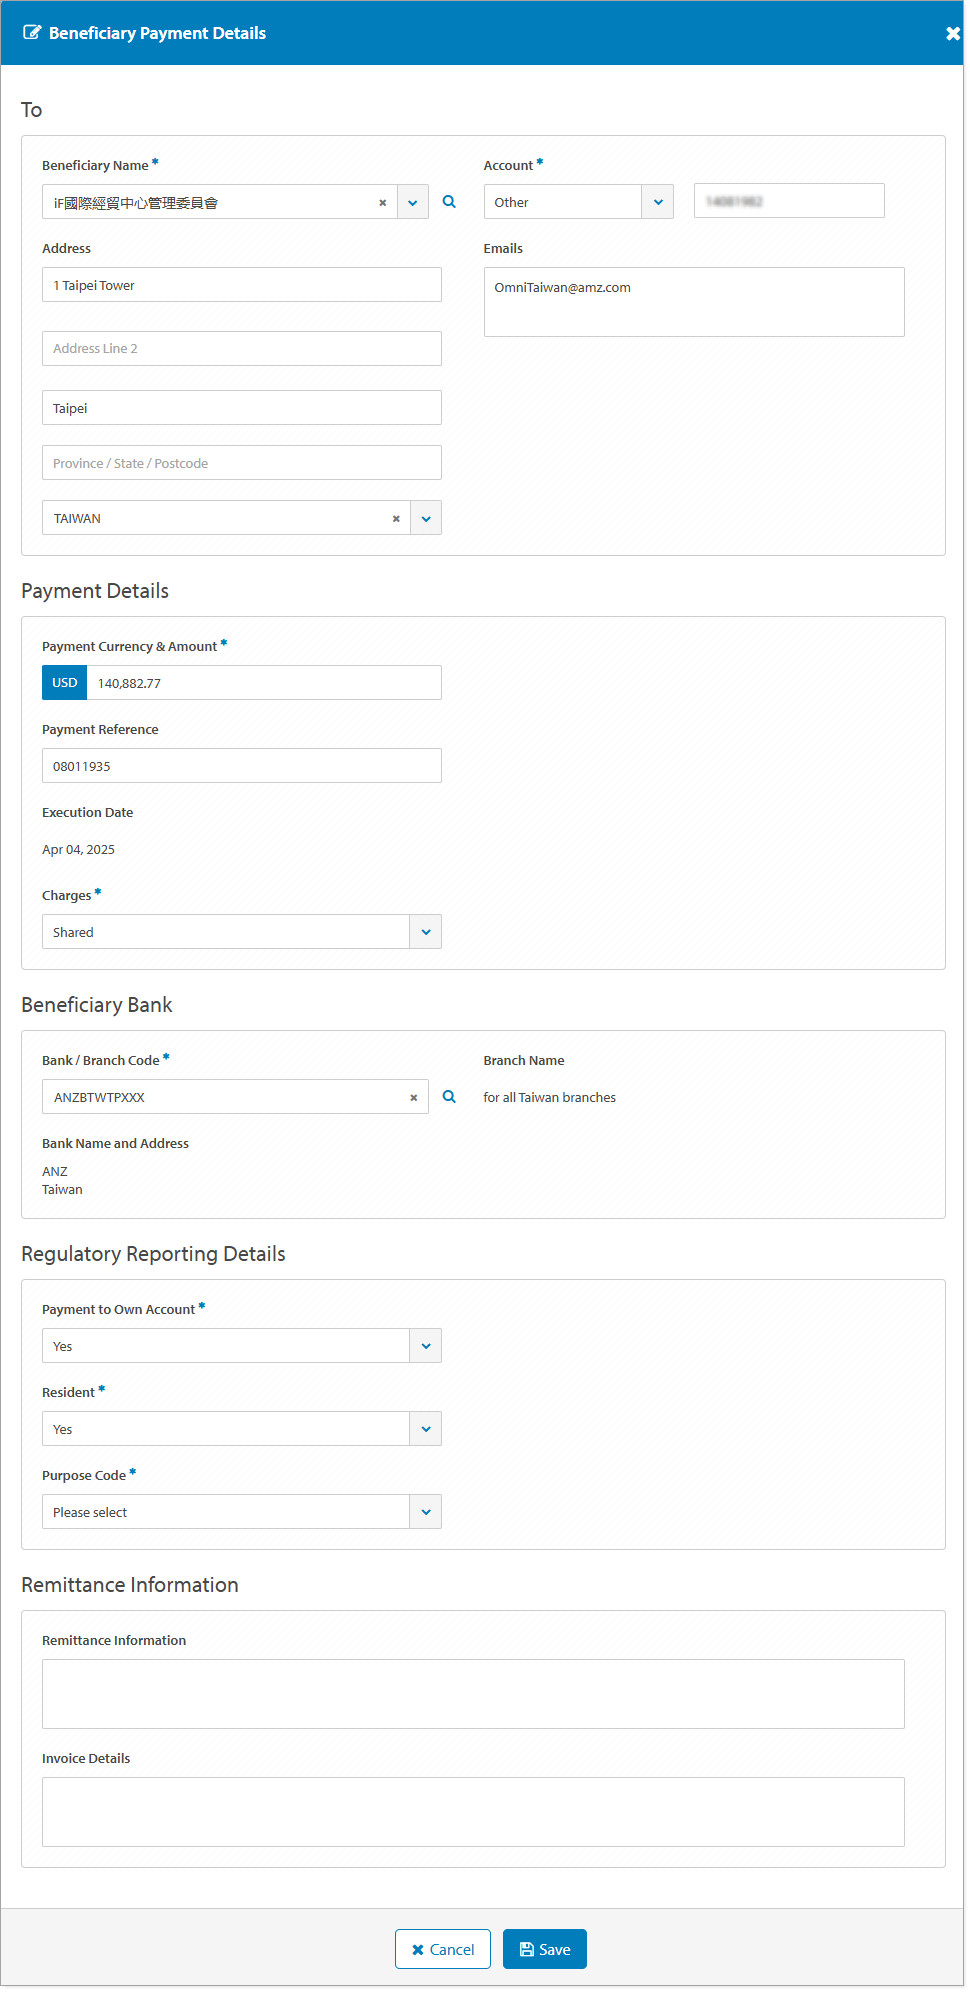
Beneficiary Payment Details screen
The following image is an example of a Beneficiary Payment Details screen with fields including the beneficiary's name, address and account details, beneficiary bank details, payment reference, remittance information and invoice details.
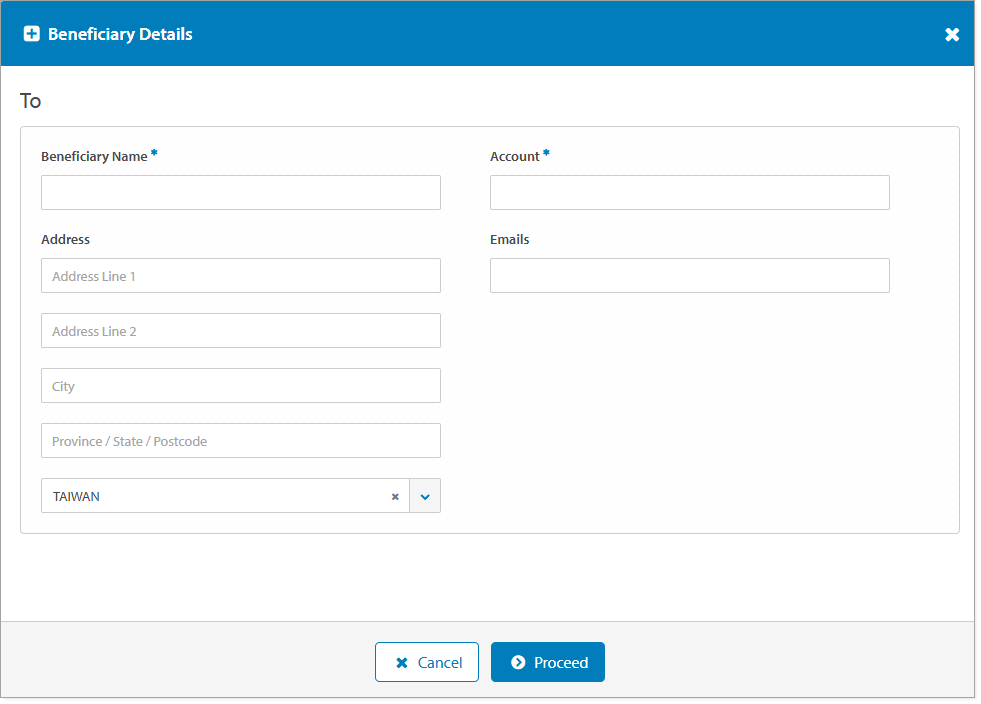
Beneficiary Details screen
The following image is an example of the Beneficiary Details screen with fields including the beneficiary's name, address, account and beneficiary email address.
Create Book Transfer Payment video
Coming soon.
Create a Book Transfer Payment
There are multiple ways you can create a domestic payment using the Book Transfer payment method from the Asia & Pacific Payments menu. Choose from the following options:
Click Create Payment > Domestic Payment (see step-by-step instructions below)
Click Approve Payments > New > Domestic Payment (see step-by-step instructions below)
Click Current Payments > New > Domestic Payment (see step-by-step instructions below)
To create a Book Transfer payment and manually enter the payment instructions, follow the steps below:
STEP
ACTION
1
Click Asia & Pacific Payments > CreatePayment menu or Click Asia & Pacific Payments > Current Payments menu > New or Click Asia & Pacific Payments > Approve Payments menu > New.
2
Click Domestic Payment.
3
If required, select the Division the payment will be made from. If you are entitled to more than one division, you can set a default division for future payments. The Bank/Branch field will prepopulate from the Division selected.
4
Select the Debit Account.
5
Select Book Transfer Payment Method The Ordering Party Name and Alternative Ordering Party Name will prepopulate based on the debit account selected.
6
Execution Date defaults with the current business date. If required, click Later to choose a future value date.
7
If required, select the Payment Currency. Refer to Processing & cut-off times for list of available payment currencies. The net Payment Amount will be populated when the Beneficiary amount(s) are entered.
8
If required, select the Individual Debits indicator to generate a separate debit entry on your account for each individual beneficiary payment instruction.
9
To reduce the risk of fraud, ANZ recommends you always confirm beneficiary details when processing a payment.
Click Add to add one or more beneficiary details using the following options:
Add Beneficiary from your Beneficiaries list
Search and select the Beneficiary from the Beneficiary Name field, then proceed to next steps. If required, click Add again to add additional beneficiaries.
Add New Beneficiary
Users must have entitlements to create new beneficiaries to complete these steps. Currently, new beneficiaries cannot be saved to your Beneficiaries menu.
STEP
ACTION
1
Click Add New Beneficiary from the Beneficiary Name field.
2
Enter Beneficiary Name up to 35 characters.
3
Enter Beneficiary Address up to 35 characters per line and City.
4
Select Country or Region.
5
Enter the Beneficiary's Account Number without spaces or hyphens.
6
If required, enter a Beneficiary email address to send a Beneficiary Advice.
Separate email addresses by a comma
Email addresses cannot exceed 50 characters
Emails will be sent to the beneficiary when payment status is Closed
7
Click Procced
8
If required, click Add again to add additional beneficiaries. Proceed to next steps.
10
If required, enter Payment Reference up to 20 characters.
11
Enter the Beneficiary payment Amount.
12
If required, click Beneficiary Payment Details icon to view and update additional beneficiary information:
Add or update Beneficiary Payment Details
STEP
ACTION
1
Add or edit Beneficiary Name up to 35 characters.
2
Add or edit Beneficiary Address up to 35 characters per line and City.
3
Add or edit Beneficiary Account without spaces or hyphens.
4
Add or edit Email Address(es) up to 50 characters.
5
Add or edit Beneficiary Amount.
6
Add or edit PaymentReference up to 20 characters.
7
Select Charges:
Ours - you pay all transfer charges, and the beneficiary receives the full amount of the payment.
Shared (default) - you pay outgoing transfer charges, and the beneficiary pays the correspondent bank charges. The beneficiary will receive the payment minus the correspondent bank charges.
Beneficiary - the beneficiary pays all transfer charges and receives the payment minus the transfer charges.
8
Add or edit the Beneficiary Bank / Branch Code.
9
Select Payment to Own Account (Yes/No).
10
Select Resident where payment in not in TWD (Yes/No).
11
If required, select the Purpose Code.
Resident to Resident book transfer:
Domestic to Domestic transfer. No FX. FCY to FCY to different client.
PURPOSE CODE
PURPOSE CODE DESCRIPTION
693L
國內外幣借貸之支出
693N
其他國內交易之支出
693P
國內服務之支出
693Q
國內碳排放權交易之支出
693R
國內貨款之支付
693S
國內外幣計價投資款項之支付
693T
國內移轉之支出
Domestic to Domestic transfer. With FX. LCY to FCY to same client.
PURPOSE CODE
PURPOSE CODE DESCRIPTION
涉及境外資金之交易
111
海運貨運費支出
112
海運客運費支出
115
航空貨運費支出
116
航空客運費支出
119A
其他運輸支出,陸路運輸
119B
其他運輸支出,貨物裝卸
119C
其他運輸支出,倉儲
119D
其他運輸支出,港口機場費用
119E
其他運輸支出,客貨運有關的佣金及代理費
121
財產保險支出
122
財產保險理賠支出
123
人身保險支出
129
人身保險理賠支出
131
商務支出
132
觀光支出
134
留學支出
135
信用卡支出
139A
其他旅行支出,講學
139B
其他旅行支出,就醫(居留國內可一年以上)
139C
其他旅行支出,競賽
191
文化及休閒支出
192
貿易佣金及代理費支出
193
營建支出
194
金融服務支出
195
使用智慧財產權支出
196
我國民間機構在國外辦公費用
19A
郵務與快遞支出
19B
電腦與資訊支出
19C
營業租賃支出
19D
專業技術及事務支出
19E
視聽支出
19F
外國政府機構之服務收入匯出款
19G
軍政機關其他服務支出
19H
加工費支出
19J
電信支出
19K
維修支出
19P
委外研發及購買研發成果資產之支出
199A
其他服務支出,服裝設計費
210
對外股本投資
220
對外貸款投資
221
對外直接投資事業及關係企業融資
250
存放國外銀行
262
投資國外股權證券
263
投資國外長期債票券
264
投資國外短期債票券
266
國外有本金交割的遠匯及換匯之資金匯出
267
國外無本金交割的衍生金融商品之資金匯出
268
購買國外虛擬資產
270
購置國外不動產
280
對外融資
281
外人發行台灣存託憑證
282
外人在台發行長期債票券
283
外人在台發行股票
299A
其他本國資金流出,押標金
299B
其他本國資金流出,保證金(不含衍生金融商品之保證金)
310
僑外股本撤資
320
償還僑外貸款投資
321
償還僑外直接投資股東及關係企業融資
330
國外信託資金匯出
340
償還國外融資
341
償還海外公司債
360
外人證券投資匯回
365
外人交易衍生金融商品匯回
366
外人借券保證金匯出
368
外人出售國內虛擬資產
370
外人出售國內不動產
371
外人收回購買國內預售屋價金
380
海外存託憑證贖回
391
償還分期付款進口融資
392
資本租賃支出
399A
其他外國資金流出,押標金
399B
其他外國資金流出,保證金(不含交易衍生金融商品及借券交易之保證金)
410
非居民薪資匯出
440
國外融資利息
441
僑外股本投資的盈餘或股利
442
股權證券股利
444
有關進口之利息
445
長期債票券利息
446
短期債票券利息
448
僑外貸款投資及融資利息
449A
其他外資投資所得,居住民使用非居住民房屋的租金支出
449B
其他外資投資所得,居住民使用非居住民土地的租金支出。
450
使用自然資源支出及貨物相關稅款
451
碳排放交易支出
510
贍家匯款支出
511
工作者匯款支出
520
捐贈匯款支出
540
購買自然資源與非研發成果資產支出
580
政府捐贈及會費支出
581
非貨物相關稅款支出
599A
其他移轉支出,違約金
599B
其他移轉支出,獎學金
599C
其他移轉支出,會員費
599D
其他移轉支出,彩券票款或獎金
599E
其他移轉支出,非因保險給付之損害賠償
599F
其他移轉支出,撫恤金
611
出口貨款退回
619
其他匯出款
701
尚未進口之預付貨款
702
燃油費及補給支出
704
樣品費支出
706
非由付款人自行辦理進口通關的貨款
70A
付款人已自行辦理進口通關的貨款
710
委外加工貿易支出
711
商仲貿易支出
720
國外訂貨但由境內供貨的貨款
801
非由付款人自行辦理進口通關的貨款(無證明文件)
802
國外訂貨但由境內供貨的貨款(無證明文件)
資金僅在境內之交易
692L
國內外幣借貸之支出
692N
其他國內交易之支出
692P
國內服務之支出
692Q
國內碳排放權交易之支出
692R
國內貨款之支付
692S
國內外幣計價投資款項之支付
692T
國內移轉之支出
692 空白
結購外匯僅作外存不再匯至國內他人帳戶或國外
Domestic to Domestic transfer. With FX. FCY to LCY to same client
PURPOSE CODE
PURPOSE CODE DESCRIPTION
涉及境外資金之交易
111
海運貨運收入
112
海運客運收入
115
航空貨運收入
116
航空客運收入
119A
其他運輸收入,陸路運輸
119B
其他運輸收入,貨物裝卸
119C
其他運輸收入,倉儲
119D
其他運輸收入,港口機場費用
119E
其他運輸收入,客貨運有關的佣金及代理費
199A
其他服務收入,服裝設計費
121
財產保險收入
122
財產保險理賠收入
123
人身保險收入
129
人身保險理賠收入
135
信用卡收入
19A
郵務與快遞收入
19B
電腦與資訊收入
19C
營業租賃收入
19D
專業技術及事務收入
19E
視聽收入
19F
外國政府機構在台辦公費用
19G
軍政機關其他服務收入
19H
加工費收入
19J
電信收入
19K
維修收入
19P
受託研發及出售研發成果資產之收入
191
文化及休閒收入
192
貿易佣金及代理費收入
193
營建收入
194
金融服務收入
195
使用智慧財產權收入
196
外國民間機構在台辦公費用
210
收回股本投資
220
收回貸款投資
221
收回對外直接投資事業及關係企業融資
250
收回國外存款
262
收回投資國外股權證券
263
收回投資國外長期債票券
264
收回投資國外短期債票券
266
國外有本金交割的遠匯及換匯之資金匯入
267
國外無本金交割的衍生金融商品之資金匯入
268
出售國外虛擬資產
270
出售國外不動產
280
收回對外融資
281
外人償還台灣存託憑證
282
外人償還在台發行長期債票券
283
外人買回在台發行股票
291
收回分期付款出口融資
292
資本租賃收入
299A
其他本國資金之流回,收回原繳交國外之押標金
299B
其他本國資金之流回,收回原繳交國外之保證金(不含衍生金融商品之保證金)
310
僑外股本投資
320
僑外貸款投資
321
僑外直接投資股東及關係企業融資
330
國外信託資金
340
國外融資
341
發行海外公司債
360
外人投資證券
365
外人交易衍生金融商品匯入
366
外人借券保證金匯入
368
外人購買國內虛擬資產
370
外人購置國內不動產
371
外人購買國內預售屋價金
380
發行海外存託憑證
399A
其他外國資金之流入,押標金
399B
其他外國資金之流入,保證金(不含衍生金融商品及借券交易之保證金)
410
薪資款匯入
440
對外融資利息
441
股本投資盈餘或股利
442
股權證券股利
443
國外存款利息
444
有關出口之利息
445
長期債票券利息
446
短期債票券利息
448
對外貸款投資及融資利息
449A
其他投資所得,居住民出租給非居住民使用房屋所收取的租金
449B
其他投資所得,居住民出租給非居住民使用土地所收取的租金
450
使用自然資源收入及貨物相關稅款
451
碳排放交易收入
511
工作者匯款收入
520
捐贈匯款收入
540
出售自然資源與非研發成果資產收入
580
政府捐贈收入
581
非貨物相關稅款收入
599A
其他移轉收入,違約金
599B
其他移轉收入,補助款
599C
其他移轉收入,獎學金
599D
其他移轉收入,會員費
599E
其他移轉收入,退稅款
599F
其他移轉收入,彩券票款或獎金
599G
其他移轉收入,非因保險給付之損害賠償
599H
其他移轉收入,撫恤金
611
進口貨款退匯
612
旅行剩餘退匯
619
其他匯入款
701
尚未出口之預收貨款
702
港口售油及補給
703
海外售魚
704
樣品費收入
706
非由收款人自行辦理出口通關的貨款
70A
收款人已自行辦理出口通關的貨款
710
委外加工貿易收入
711
商仲貿易收入
720
依國外客戶指示在國內交貨的貨款
801
非由收款人自行辦理出口通關的貨款(無證明文件)
802
依國外客戶指示在國內交貨的貨款(無證明文件)
資金僅在境內之交易
692L
國內外幣借貸之收入
692N
其他國內交易之收入
692P
國內服務之收入
692Q
國內碳排放權交易之收入
692R
國內貨款之收入
692S
國內外幣計價投資款項之收入
692T
國內移轉之收入
692空白
結售之外匯原係以新臺幣結購存入
Domestic to Domestic transfer. With FX. FCY to FCY to same client
PURPOSE CODE
PURPOSE CODE DESCRIPTION
694
外幣互換兌出
Resident to Non-Resident book transfer:
Domestic to Overseas transfer. No FX. FCY to FCY.
PURPOSE CODE
PURPOSE CODE DESCRIPTION
111
海運貨運費支出
112
海運客運費支出
115
航空貨運費支出
116
航空客運費支出
119A
其他運輸支出,陸路運輸
119B
其他運輸支出,貨物裝卸
119C
其他運輸支出,倉儲
119D
其他運輸支出,港口機場費用
119E
其他運輸支出,客貨運有關的佣金及代理費
121
財產保險支出
122
財產保險理賠支出
123
人身保險支出
129
人身保險理賠支出
131
商務支出
132
觀光支出
134
留學支出
135
信用卡支出
139A
其他旅行支出,講學
139B
其他旅行支出,就醫(居留國內可一年以上)
139C
其他旅行支出,競賽
191
文化及休閒支出
192
貿易佣金及代理費支出
193
營建支出
194
金融服務支出
195
使用智慧財產權支出
196
我國民間機構在國外辦公費用
19A
郵務與快遞支出
19B
電腦與資訊支出
19C
營業租賃支出
19D
專業技術及事務支出
19E
視聽支出
19F
外國政府機構之服務收入匯出款
19G
軍政機關其他服務支出
19H
加工費支出
19J
電信支出
19K
維修支出
19P
委外研發及購買研發成果資產之支出
210
對外股本投資
220
對外貸款投資
221
對外直接投資事業及關係企業融資
250
存放國外銀行
262
投資國外股權證券
263
投資國外長期債票券
264
投資國外短期債票券
266
國外有本金交割的遠匯及換匯之資金匯出
267
國外無本金交割的衍生金融商品之資金匯出
268
購買國外虛擬資產
270
購置國外不動產
280
對外融資
299A
其他本國資金流出,押標金
299B
其他本國資金流出,保證金(不含衍生金融商品之保證金)
310
僑外股本撤資
320
償還僑外貸款投資
321
償還僑外直接投資股東及關係企業融資
330
國外信託資金匯出
340
償還國外融資
341
償還海外公司債
360
外人證券投資匯回
365
外人交易衍生金融商品匯回
366
外人借券保證金匯出
368
外人出售國內虛擬資產
370
外人出售國內不動產
371
外人收回購買國內預售屋價金
380
海外存託憑證贖回
391
償還分期付款進口融資
392
資本租賃支出
399A
其他外國資金流出,押標金
399B
其他外國資金流出,保證金(不含交易衍生金融商品及借券交易之保證金)
410
非居民薪資匯出
440
國外融資利息
441
僑外股本投資的盈餘或股利
442
股權證券股利
444
有關進口之利息
445
長期債票券利息
446
短期債票券利息
448
僑外貸款投資及融資利息
449A
其他外資投資所得,居住民使用非居住民房屋的租金支出
449B
其他外資投資所得,居住民使用非居住民土地的租金支出。
450
使用自然資源支出及貨物相關稅款
451
碳排放交易支出
510
贍家匯款支出
511
工作者匯款支出
520
捐贈匯款支出
540
購買自然資源與非研發成果資產支出
580
政府捐贈及會費支出
581
非貨物相關稅款支出
599A
其他移轉支出,違約金
599B
其他移轉支出,獎學金
599C
其他移轉支出,會員費
599D
其他移轉支出,彩券票款或獎金
599E
其他移轉支出,非因保險給付之損害賠償
599F
其他移轉支出,撫恤金
611
出口貨款退回
619
其他匯出款
701
尚未進口之預付貨款
702
燃油費及補給支出
704
樣品費支出
706
非由付款人自行辦理進口通關的貨款
70A
付款人已自行辦理進口通關的貨款
710
委外加工貿易支出
711
商仲貿易支出
720
國外訂貨但由境內供貨的貨款
801
非由付款人自行辦理進口通關的貨款(無證明文件)
802
國外訂貨但由境內供貨的貨款(無證明文件)
Non-Resident to Resident book transfer:
Overseas to Domestic transfer. No FX. FCY to FCY.
PURPOSE CODE
PURPOSE CODE DESCRIPTION
111
海運貨運收入
112
海運客運收入
115
航空貨運收入
116
航空客運收入
119A
其他運輸收入,陸路運輸
119B
其他運輸收入,貨物裝卸
119C
其他運輸收入,倉儲
119D
其他運輸收入,港口機場費用
119E
其他運輸收入,客貨運有關的佣金及代理費
121
財產保險收入
122
財產保險理賠收入
123
人身保險收入
129
人身保險理賠收入
135
信用卡收入
191
文化及休閒收入
192
貿易佣金及代理費收入
193
營建收入
194
金融服務收入
195
使用智慧財產權收入
196
外國民間機構在台辦公費用
19A
郵務與快遞收入
19B
電腦與資訊收入
19C
營業租賃收入
19D
專業技術及事務收入
19E
視聽收入
19F
外國政府機構在台辦公費用
19G
軍政機關其他服務收入
19H
加工費收入
19J
電信收入
19K
維修收入
19P
受託研發及出售研發成果資產之收入
199A
其他服務收入,服裝設計費
210
收回股本投資
220
收回貸款投資
221
收回對外直接投資事業及關係企業融資
250
收回國外存款
262
收回投資國外股權證券
263
收回投資國外長期債票券
264
收回投資國外短期債票券
266
國外有本金交割的遠匯及換匯之資金匯入
267
國外無本金交割的衍生金融商品之資金匯入
268
出售國外虛擬資產
270
出售國外不動產
280
收回對外融資
291
收回分期付款出口融資
292
資本租賃收入
299A
其他本國資金之流回,收回原繳交國外之押標金
299B
其他本國資金之流回,收回原繳交國外之保證金(不含衍生金融商品之保證金)
310
僑外股本投資
320
僑外貸款投資
321
僑外直接投資股東及關係企業融資
330
國外信託資金
340
國外融資
341
發行海外公司債
360
外人投資證券
365
外人交易衍生金融商品匯入
366
外人借券保證金匯入
368
外人購買國內虛擬資產
370
外人購置國內不動產
371
外人購買國內預售屋價金
380
發行海外存託憑證
399A
其他外國資金之流入,押標金
399B
其他外國資金之流入,保證金(不含衍生金融商品及借券交易之保證金)
410
薪資款匯入
440
對外融資利息
441
股本投資盈餘或股利
442
股權證券股利
443
國外存款利息
444
有關出口之利息
445
長期債票券利息
446
短期債票券利息
448
對外貸款投資及融資利息
449A
其他投資所得,居住民出租給非居住民使用房屋所收取的租金
449B
其他投資所得,居住民出租給非居住民使用土地所收取的租金
450
使用自然資源收入及貨物相關稅款
451
碳排放交易收入
511
工作者匯款收入
520
捐贈匯款收入
540
出售自然資源與非研發成果資產收入
580
政府捐贈收入
581
非貨物相關稅款收入
599A
其他移轉收入,違約金
599B
其他移轉收入,補助款
599C
其他移轉收入,獎學金
599D
其他移轉收入,會員費
599E
其他移轉收入,退稅款
599F
其他移轉收入,彩券票款或獎金
599G
其他移轉收入,非因保險給付之損害賠償
599H
其他移轉收入,撫恤金
611
進口貨款退匯
612
旅行剩餘退匯
619
其他匯入款
701
尚未出口之預收貨款
702
港口售油及補給
703
海外售魚
704
樣品費收入
706
非由收款人自行辦理出口通關的貨款
70A
收款人已自行辦理出口通關的貨款
710
委外加工貿易收入
711
商仲貿易收入
720
依國外客戶指示在國內交貨的貨款
801
非由收款人自行辦理出口通關的貨款(無證明文件)
802
依國外客戶指示在國內交貨的貨款(無證明文件)
Additional Purpose Code Description will prepopulate, based on the Purpose Code selected.
12
If required, enter Remittance Information up to 140 characters and will appear on the Beneficiary Advice and Payment Details Report.
13
If required, enter Invoice Details up to 80 x 60 lines and will appear on the Beneficiary Advice and Payment Details Report.
14
Click Save.
13
If required, repeat above steps to add each beneficiary.
14
If required, choose Rate Type:
Carded - FX rate is indicative only and subject to change at any time without notice.
Contract - enter booked Contract ID and FX Rate.
15
Click Review & Submit.
16
Click Submit.
Errors and Alerts
Error and alert messages such as 'fields validations' display information about the impacted field(s) and highlights the field(s) in red. Error messages are specific to the payment method types, fields available and particulars validations. You can update the information within the impacted field(s) and continue processing the payment.
Mandatory field validations:
Foreign exchange field validations:
Field validations:
Next Steps
When the payment has been successfully submitted and is now in a Pending Approval status, you can choose from the following on-screen options:
Review this Payment from the Payment Details screen
View Approve Payments from the Approve Payments screen
Save Payment as Template to the Templates menu
Create a New Payment
Click OK to return to the Create Payment screen
When the payment has been successfully submitted for approval(s), the next steps can be: